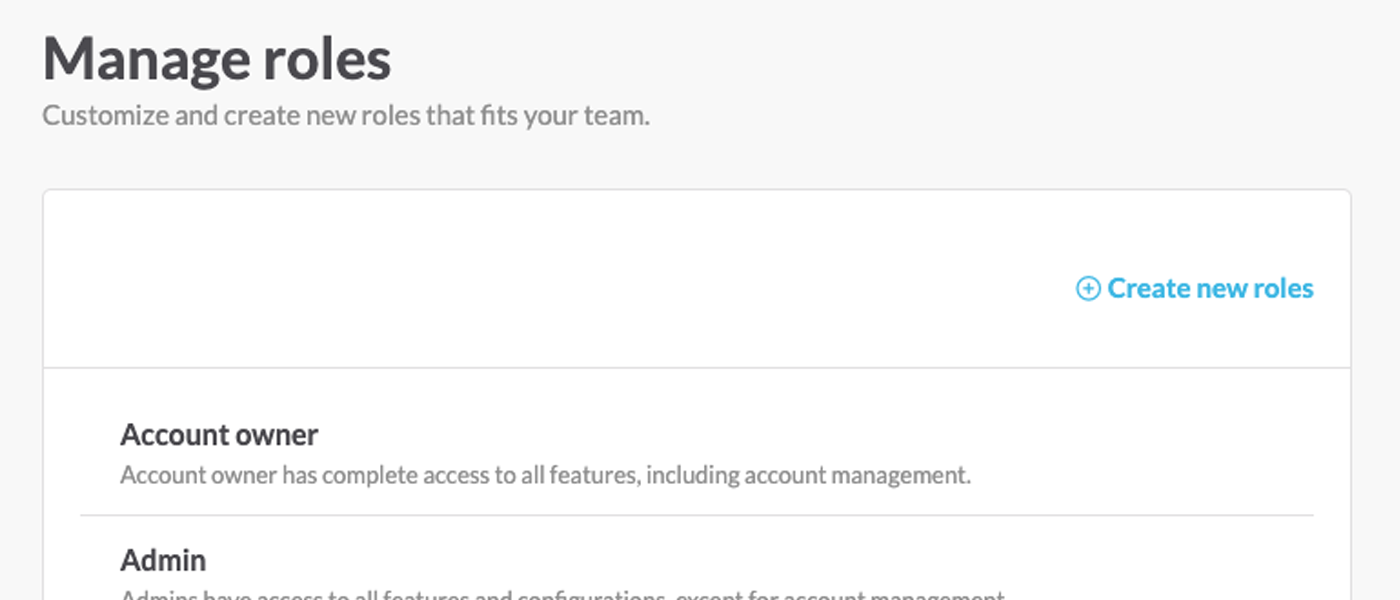
Create New Roles
If you are using an Enterprise Plan, you can create new roles other than basic roles provided by OQUPIE. Freely define roles that fit your organization and work system by using ‘Create new roles’.
Understanding Roles
OQUPIE has previously defined Default roles and new roles defined by users.
Basic role is a default role defined by OQUPIE as account owner, admin, pro agent, or agent.
[Table 1] Basic Roles
| Default Roles | Description |
| Account owner | The Account owner role is given to newly created account at first. The Account owner
has complete access to all the features in OQUPIE, including editing and deleting
accounts. So, you must be careful when changing the account owner. |
| Admin | The Admin has access to all the features in OQUPIE except ‘Manage Account’. The
Admin has access to the settings and various data except for the OQUPIE account.
Also, the Admin can work on all the received tickets. |
| Pro agent | Pro agent: The Pro agent work as a bridge between manager and agents. Apart from
the agent role, pro agent has access to Check All Tickets, Admin Notification Settings,
etc. |
| Agent | The Agent performs professional customer support works and has access to Tickets,
Manage Customer, My Profile, Knowledge Base and Canned Response. |
Understand New Roles
- When a company or organization needs an additional customized role, new customized role can be created. You can add up to 5 ‘New Roles’ with ‘Create New Roles’
Create New Roles
- Go to OQUPIE>Settings ⚙️>Organization >Manage Roles.
- Click on Create New Roles.
- Enter name and description of the role and select authority. (See ‘ New Role Authority’)
- Set new role and click save. New role will be added to Manage Roles page.
[Table 2] New Role Authority
| Menu | Description |
| Dashboard | Set a dashboard that can be viewed by members. See View admin dashboard.
Refer. All members can view the ‘Personal Dashboard’. |
| Ticket | You can set a member’s scope of access to tickets, and authority to update, block and delete.
Scope of Ticket Box to work on
- View and edit all tickets (ticket update/ add/ edit) or
- View and edit tickets assigned to me and my group (ticket update/ add/ edit)
Additional Action
- Register Spam (ticket block) and customer block
- Delete ticket |
| Customer | You can set customer registration, profile edit, block, etc.
- Edit customer (add/edit)
- Delete customer
Refer. If you cancel all the above features, member can only access to ‘View’ in Manage Customer. |
Knowledge
Base | You can set the scope of work on Canned Response and work content.
Scope of work on Canned Response (All/individual)
- Canned Response by all or
- Canned Response by me and work content (action on scope of work)
- Edit (Add / Edit)
- Delete
Refer. All members can only view and use ‘Canned Response’ that are set to ‘Public’, no matter what the scope of work or content is. |
Canned
Response | You can set the scope of work on Canned Response and work content. Scope of work on Canned Response (All/individual)
- Canned Response by all
or
- Canned Response by me and work content (action on scope of work)
- Edit (Add / Edit)
- Delete
Refer. All members can only view and use ‘Canned Response’ that are set to ‘Public’, no matter what the scope of work or content is. |
| Report | You can set access to view and data download for report.
- View Overview Report
- View Daily Detailed Report
- View Status Members
- Export as CSV
Refer. If all ‘View Report’ is canceled, ‘Report’ menu does not show up on the member’s(role’s) account. |
| Management | You can define ‘Manage Role Execution’ such as Brands, Organization , Set Gadget.
- Do not execute Manage Role
or
- Execute Manage Role
Connect
- View Connect
- Edit Connect (add/edit)
- Delivery Bot to Delete Connect
- Edit Delivery Bot (add/edit)
- Delete Delivery Bot
Schedule Bot
- View Schedule Bot
- Edit Schedule Bot
Customer Noti-bot
- View Customer Noti-bot
- Edit Customer Noti-bot
Notification Settings
- Manage all notifications
Organization
- Manage member and group (view/add/edit)
- Delete member and group
- Manage roles (add/edit/delete)
Brands
- Manage brand (view/add/edit)
- Delete brand
Refer. In Connect, Delivery Bot, Schedule Bot, Customer Noti-bot, Organization, Manage Brand, access to view must be selected to setup edit and delete.
|
💡 Refer. ‘New Role’ defined by the user cannot have access to ‘Payments’ and ‘System’ which are only for admin and above.
Edit New Role
- Click new role for editing in Manage Roles page. Or click ••• (More) and select edit.
- Change contents in the detail page of roles and click save changes.
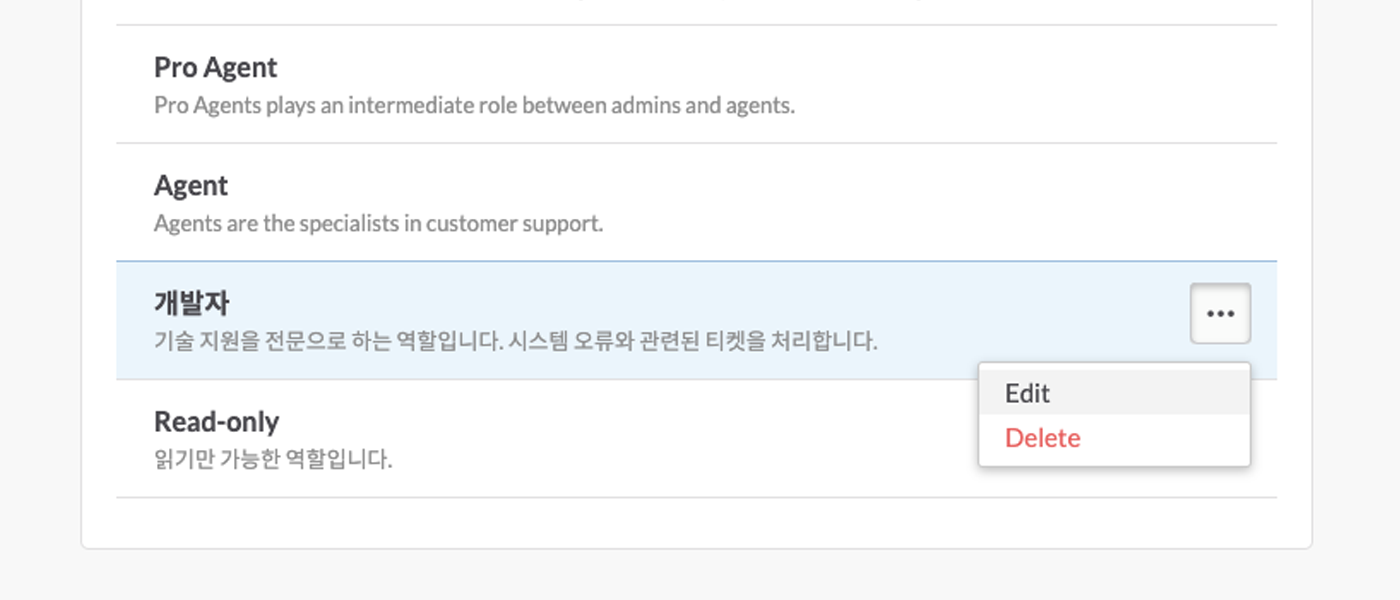
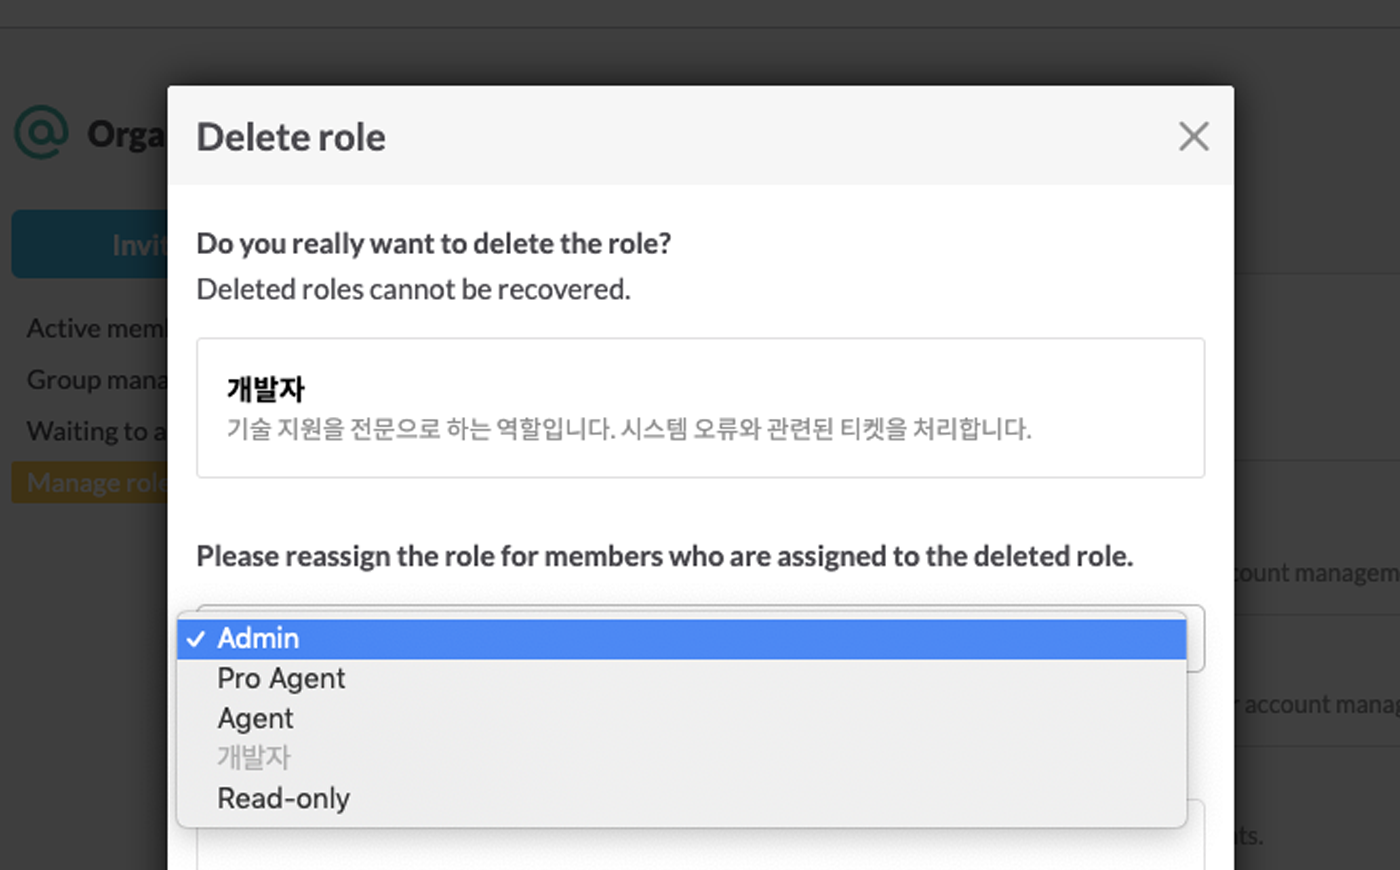
Delete New Role
- Go to the role to be deleted in Manage Roles>List.
- Click ••• (More) and select delete.
- In the "Delete Roles window", assign a new role to a member who is playing the role to be deleted and click the Delete button.
💡 Refer. Account owner, admin, pro agent and agent are basic roles defined by OQUPIE. Thus. its details cannot be changed or deleted.
Apply New Role
- Go to OQUPIE>Settings⚙️>Organization >Active Members.
- Select a member to grant a new role and click Additional Action>Chang Role or
••• (More). - Select a new role and click ‘update’.
- Add table on authority and access
- Short cut at the top
- Description on technology by access type following short cut and note by technology (Notice)
- Authority not granted to customized role
