
-> Download Link
✓ A better environment for your customer to ask
✓ A better customer support experience with more information
💡 OQUPIE Unreal Engine 4 Plug-in does not include UI elements. Please create your own UI for the game.
Step.1 Activating Customer Portal and Generating Access Key and Secret Key

Step.2 Create new project
public class OQUPIESample : ModuleRules
 {
     public OQUPIESample(ReadOnlyTargetRules Target) : base(Target)
     {
         PCHUsage = PCHUsageMode.UseExplicitOrSharedPCHs;

         PublicDependencyModuleNames.AddRange(
            new string[]
            {
                "Core",
                "CoreUObject",
                "Engine",
                "InputCore",
                "OQUPIE"
            }
        );
{
     "FileVersion": 3,
     "EngineAssociation": "4.19",
     "Category": "",
     "Description": "",
     "Modules": [
         {
             "Name": "OQUPIESample",
             "Type": "Runtime",
             "LoadingPhase": "Default",
             "AdditionalDependencies": [
                 "Engine"
             ]
         }
     ],
     "Plugins": [
         {
             "Name": "OQUPIE",
             "Enabled": true
         },
         {
             "Name": "WebBrowserWidget",
             "Enabled": true
         }
     ]
 }
Create Visual Studio Project for UE4 version 4.19.
Open OQUJPIE.sln Visual Studio project file and proceed to compile.
Step.3 Setting Blueprint
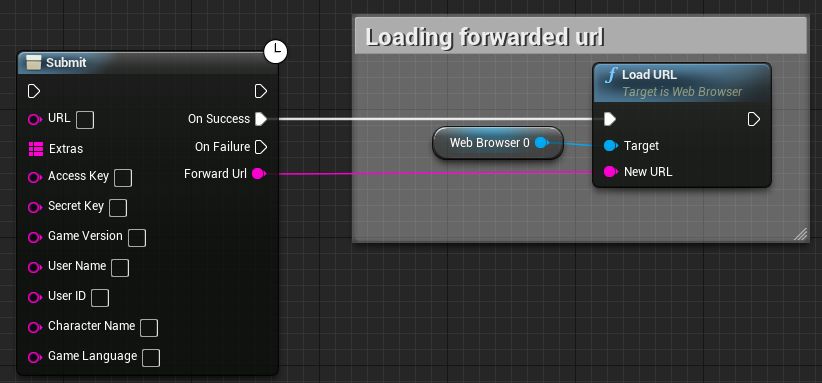
URL that you get returned after calling Submit is the customer portal URL that you connected with the plug-in. The sample shows you how you get forwarded when Submit succeed.
Check parameters OQUPIE offers. ( You can check at *Step 1)
Check parameters you have to set.
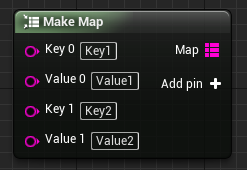
Extras : information you can customize. Use form as TMap
GameVersion : Game version
User Name : User name
User ID : User ID
Character Name : Game character name
Game Language : Game language setting
Information sample that is transfered to your OQUPIE
{
     "pcInfo":
     {
         "sdkVersion": "OQUPIE 1.0",
         "gameVersion": "1.0.0.1",
         "userName": "UserName1",
         "userID": "Player1",
         "characterName": "Character Name 1",
         "gameLanguage": "kr",
         "applicationLanguage": "en",
         "operatingSystem": "Windows 10 version 10.0.17134.1.768.64bit",
         "cpuModel": "Intel(R) Core(TM) i7-4790 CPU @ 3.60GHz",
         "systemMemorySize": 16,
         "graphicsDeviceName": "NVIDIA GeForce GTX 960",
         "graphicsMemorySize": 2,
         "graphicsShaderLevel": "D3D11",
         "graphicsFeatureLevel": "Direct3D 11+ (SM5)",
         "ipAddress": "115.188.253.22/192.168.1.70",
         "hddAvailable": "183.72GB/447.13GB",
         "windowMode": "Windowed",
         "windowResolution": "1920x1080",
         "soundDeviceName": "Speakers (Realtek High Definition Audio)",
         "extras":
         {
             "Key1": "Value1",
             "Key2": "Value2"
         }
     }
 }
💡 OQUPIE Unreal Engine 4 Plug-in does not include UI elements. Please create your own UI for the game.
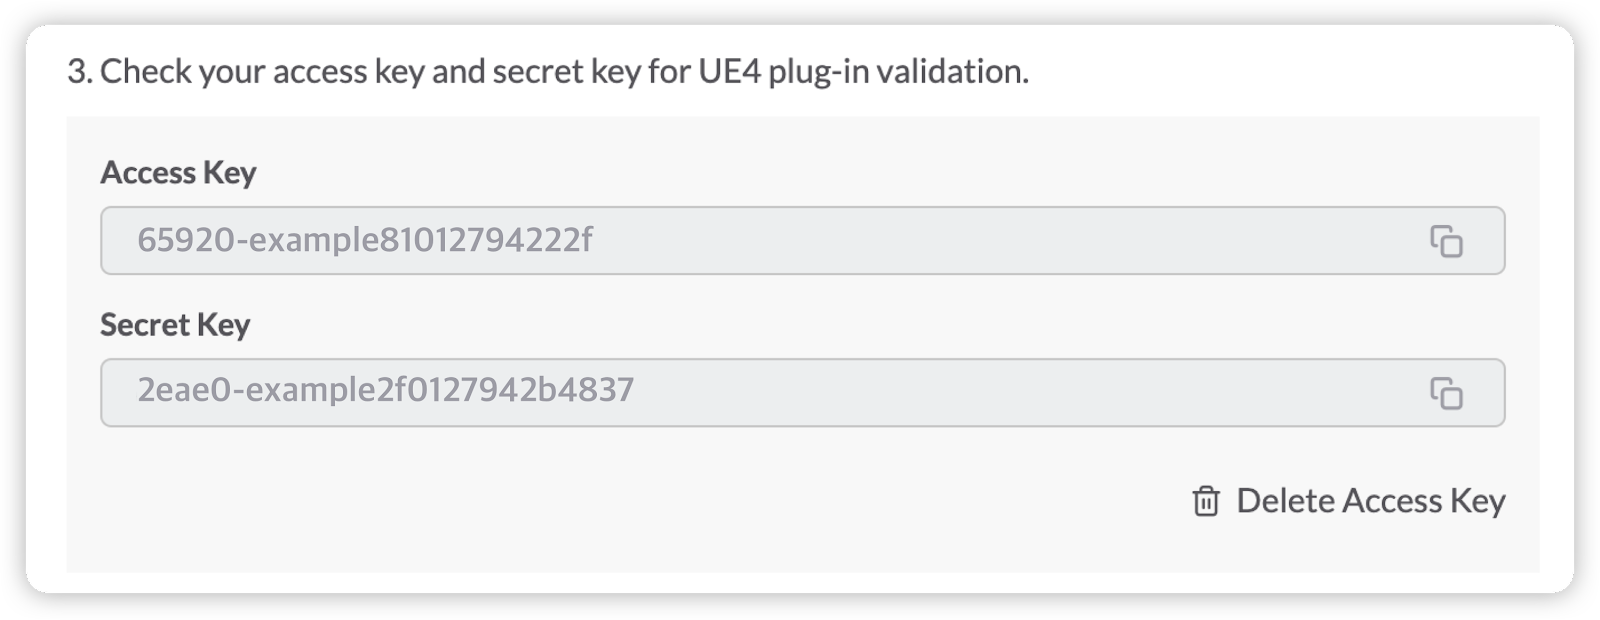
Step.1 Activating Customer Portal and Generating Access Key and Secret Key
 Portal URL and access key are required in Step.3*
Step.2 Create new project
public class OQUPIESample : ModuleRules
 {
     public OQUPIESample(ReadOnlyTargetRules Target) : base(Target)
     {
         PCHUsage = PCHUsageMode.UseExplicitOrSharedPCHs;

         PublicDependencyModuleNames.AddRange(
            new string[]
            {
                "Core",
                "CoreUObject",
                "Engine",
                "InputCore",
                "OQUPIE"
            }
        );
{
     "FileVersion": 3,
     "EngineAssociation": "4.19",
     "Category": "",
     "Description": "",
     "Modules": [
         {
             "Name": "OQUPIESample",
             "Type": "Runtime",
             "LoadingPhase": "Default",
             "AdditionalDependencies": [
                 "Engine"
             ]
         }
     ],
     "Plugins": [
         {
             "Name": "OQUPIE",
             "Enabled": true
         },
         {
             "Name": "WebBrowserWidget",
             "Enabled": true
         }
     ]
 }
Step.3 Setting Blueprint

URL that you get returned after calling Submit is the customer portal URL that you connected with the plug-in. The sample shows you how you get forwarded when Submit succeed.
Check parameters OQUPIE offers. ( You can check at *Step 1)
Check parameters you have to set.
Information sample that is transfered to your OQUPIE
{
     "pcInfo":
     {
         "sdkVersion": "OQUPIE 1.0",
         "gameVersion": "1.0.0.1",
         "userName": "UserName1",
         "userID": "Player1",
         "characterName": "Character Name 1",
         "gameLanguage": "kr",
         "applicationLanguage": "en",
         "operatingSystem": "Windows 10 version 10.0.17134.1.768.64bit",
         "cpuModel": "Intel(R) Core(TM) i7-4790 CPU @ 3.60GHz",
         "systemMemorySize": 16,
         "graphicsDeviceName": "NVIDIA GeForce GTX 960",
         "graphicsMemorySize": 2,
         "graphicsShaderLevel": "D3D11",
         "graphicsFeatureLevel": "Direct3D 11+ (SM5)",
         "ipAddress": "115.188.253.22/192.168.1.70",
         "hddAvailable": "183.72GB/447.13GB",
         "windowMode": "Windowed",
         "windowResolution": "1920x1080",
         "soundDeviceName": "Speakers (Realtek High Definition Audio)",
         "extras":
         {
             "Key1": "Value1",
             "Key2": "Value2"
         }
     }
 }


