Set up enhanced security for portal findeㅓr with JWT.
💡 : JWT and query string types cannot be used at the same time.
Content
JWT method
- JWT algorithm
- Token creation example
- Endpoint URL for JWT request with OQUPIE
- Data to be included in JWT payload
JWT method
There is potenial risk that the secret key can be easily exposed when the GET method uses query strings in the URL. If the access key and secret key are exposed, anyone can access your portal finder.
The JWT method is a more secure method to authenticate users sending request.
Let's look at the following in order.
- JWT algorithm
- Token creation example
- Endpoint URL for JWT request with OQUPIE
- Data to be included in JWT payload
1. JWT algorithm
- What is included in the JWT header. The official description is as follows:
| The header typically consists of two parts: the type of the token, which is JWT, and the signing algorithm being used, such as HMAC SHA256 or RSA. - OQUPIE basically uses the HMAC SHA256(HS256) algorithm.
- Exmaple
{
"alg" : "HS256":,
"typ" : "JWT"
}
2. Token creation example
💡 : WT and query string types cannot be used at the same time.
💡 : The token must be generated dynamically on the server side when the page loads.
- Let's create a token using a Python example.
import time
import jwt

secret_key = 'yourportalfindersecretkey'  # secret key: used to create signature

# payload data
data =
'access_key': 'given-access-key',  # required
'brand_key1': 'ko',  # required
'brand_key2': 'asia',  # required if set

'brand_key3': 'oqupie',  # required if set
 'userEmail': 'end.user@example.com',
 'userId': 'endUser',
'userName': 'Hong Gildong',
'deviceModel': 'iPhone 11',

'operatingSystem': 'ios 12',

'applicationLanguage': 'ko',
'exp': int(time.time()) + (60 * 60)  # token vaild time: 1hour
 }


token = jwt.encode(data, key=secret_key)
 print(token.decode())

# print out the token below
 """
 eyJ0eXAiOiJKV1QiLCJhbGciOiJIUzI1NiJ9.eyJhY2Nlc3Nfa2V5IjoiZ2l2ZW4tYWNjZXNzLWtleSIsImJyYW5kX2tleTEiOiJrbyIsImJyYW5kX2tleTIiOiJhc2lhIiwiYnJhbmRfa2V5MyI6Im9xdXBpZSIsInVzZXJFbWFpbCI6ImVuZC51c2VyQGV4YW1wbGUuY29tIiwidXNlcklkIjoiZW5kVXNlciIsInVzZXJOYW1lIjoiSG9uZyBHaWxkb25nIiwiZGV2aWNlTW9kZWwiOiJpUGhvbmUgMTEiLCJvcGVyYXRpbmdTeXN0ZW0iOiJpb3MgMTIiLCJhcHBsaWNhdGlvbkxhbmd1YWdlIjoia28iLCJleHAiOjE1ODI2MTQ1Mjl9.WNr4wzWdaTGbpLMmMl4AP1yuqM1cY1SBphwM_tEvo34

 """
- Let's create a token using a Python example.
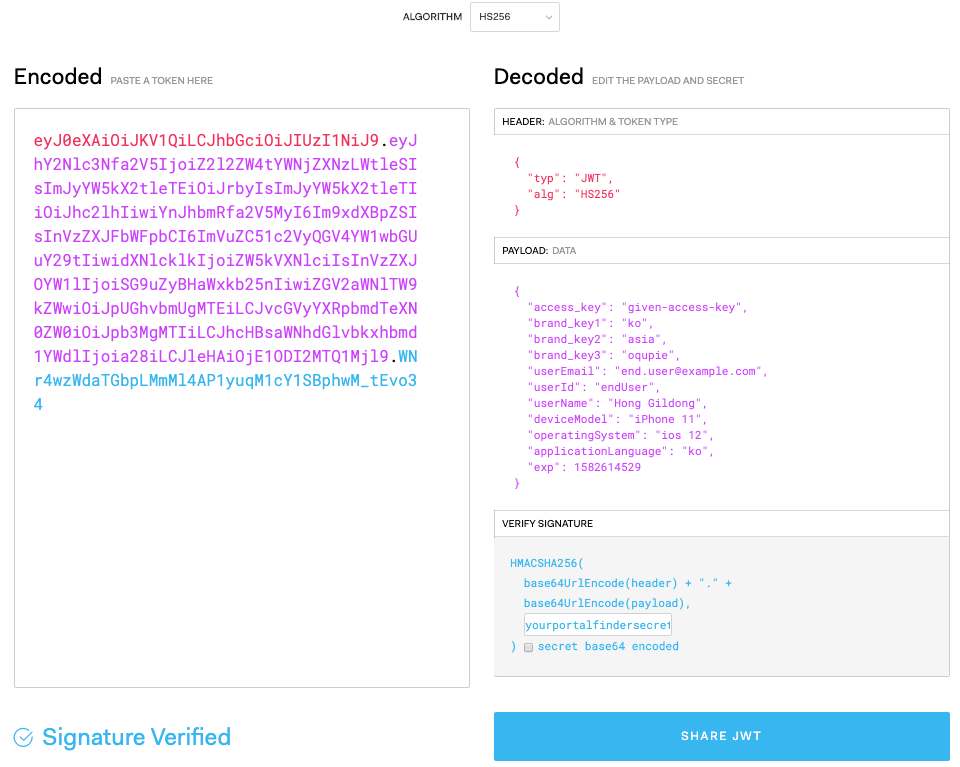
- The "secret_key" used to create the token is the same as the secret key generated in the portal finder setup. It must be used when generating a token, and the key is used when authenticating the token in the OQUPIE server. The difference from the usual way is that the secret key is left out for VERIFY SIGNATURE purposes in what should be included in the data part.
3. Endpoint URL for JWT request with OQUPIE
- Send the JWT generated by the above algorithm to the endpoint URL of the existing portal finder (https://.oqupie.com/portals/finder).
- Apply the following to the URL query string.
https://.oqupie.com/portals/finder?jwt={jwt_payload} - Sending a request with the token generated above looks like this:
curl -v -X GET 'https://subdomain.oqupie.com/portals/finder?jwt=eyJ0eXAiOiJKV1QiLCJhbGciOiJIUzI1NiJ9.eyJhY2Nlc3Nfa2V5IjoiZ2l2ZW4tYWNjZXNzLWtleSIsImJyYW5kX2tleTEiOiJrbyIsImJyYW5kX2tleTIiOiJhc2lhIiwiYnJhbmRfa2V5MyI6Im9xdXBpZSIsInVzZXJFbWFpbCI6ImVuZC51c2VyQGV4YW1wbGUuY29tIiwidXNlcklkIjoiZW5kVXNlciIsInVzZXJOYW1lIjoiSG9uZyBHaWxkb25nIiwiZGV2aWNlTW9kZWwiOiJpUGhvbmUgMTEiLCJvcGVyYXRpbmdTeXN0ZW0iOiJpb3MgMTIiLCJhcHBsaWNhdGlvbkxhbmd1YWdlIjoia28iLCJleHAiOjE1ODI2MTQ1Mjl9.WNr4wzWdaTGbpLMmMl4AP1yuqM1cY1SBphwM_tEvo3
4. Data to be included in JWT payload
- It is basically the same as the Portal Finder parameter. The difference is that the secret key is used to generate the token.
[Required payload data for the Portal finder JWT]
| data | description | required |
| access_key | The key used to find a specific portal finder set. Corresponds to "Access key" in Basic setting. | yes |
| brand_key1 | This is the first value for "Brand key" entered in Add brand connection. The Portal Finder connects customers to the appropriate customer portal depending on the key value. | yes |
| brand_key2 | This is the second value for "Brand key" entered in Add brand connection. The Portal Finder connects customers to the appropriate customer portal depending on the key value. | no (optional) |
| brand_key3 | This is the third value for "Brand key" entered in Add brand connection. The Portal Finder connects customers to the appropriate customer portal depending on the key value. | no (optional) |
